Saturday, May 16, 2015

My new friend, Babe, the Longarm

I still can't believe the ad in the paper a couple of weeks ago.


It was true!  And the owner was so nice, I nearly started sobbing that she wanted to give her wonderful machine to me!
My family was great.  They moved things, SIL borrowed a trailer, rounded up help and we got her in!


I have a wonderful friend, Loretta Orsborn of Orsborn Specialty Quilting, and she came and helped me oil her and set up a practice quilt and she works beautifully!!!  She still needs a few things, like new leads and fresh thread, but I love her.

I've read it's a tradition to name your beautiful Longarm machine after a grandmother, so I've dubbed her "Babe", after the paternal grandmother I never got to meet.  I'm sure I could have learned a lot from her, but that's another story.
So Babe and I have been having lots of fun together.  She doesn't have any bells and whistles, but we get along good.  She's basic, just like me!
Hopefully future blogs will be full of pictures of wonderful quilts I've made and quilted.

Wednesday, May 13, 2015

New Projects!

I can't believe I haven't blogged since last November!  Well, here's a quick, ongoing project that I had fun starting at Loretta Orsborn's Bargello quilt class that started last Saturday.  I've tried to attach a downloaded photo of Loretta's quilt. It may our may not show up at the end.

The link to this class is at www.sweettreasuresquilts.com

It is simple amazing!  I hope my feeble attempts turn out even close to the movement in hers.

This is my main stripset

I


So tonight I'm sewing strip sets together.  I finished one as a sample but I need 12. So back to the machine!


Sunday, November 16, 2014

It's Sewvember!

Well, I was just saying this evening that it's been about a year since I updated my blog.  Apparently google is telling me it's been a year and a half!  Time does fly!  There has been so much going on with all my needles but I'll just start with the fun of SewVember.
On Instagram, member Bimble and Pimble has started a challenge calling it the ever popular "Sewvember".  We are asked to post a picture each day according to the list she provides.  Since she is on Australia time and I am on US pacific time, I get a whole day extra to think about what picture to take to fit into the category. Here is the list:


So you can see how fun this has been.  With today being the 16th, I'm about halfway done.
Here are some of my posts:
This UFO is now finished.  The inspiration of the post got it out and done!  With a minor modification, I will probably now use it.  Picture next time.  (The recycled denim jeans are no longer my style as they would have been a few years ago when I cut it out)  The 14th.
Of Course I couldn't show my entire library.  And , also of course, I neatened up the bookcase a bit before the picture.  The 15th.

I do love my pegboard area!  (the 16th)


My Stash, or course only an unembarrasing amount!  The  3rd.

Inspiration from my walk around the block. The 10th.
The 13th.

Tomorrow is set to be Planning.  I'm not sure what I will do with that one.  Do you plan your projects in advance?  Or are you a spur of the minute project starter?  I think I'm an advance planner, but when with friends at a fabric store, I can be a spur of the minute kind of gal.
This has spurred me to spend much more time in my sewing room and I'm loving it!  I find I smile without even knowing it and I'm finding myself humming with any music on.  I have some more projects on my sewing table and I'm on my way to getting them started...  
Until next time!
Sew On!

Monday, April 29, 2013

The Sassy Librarian - Part 2, and finis!

This blouse was so fun to make and the class is a great one to take!  If you missed my last post, this is referring to the class I took on Craftsy.com,  The Sassy Librarian Blouse .  This class is good for beginners and advanced sewist alike.
The instructor, Christine Haynes, is a pattern designer and an excellent teacher.  Even though I say it's good for beginners, you do need to know how to use your sewing machine.  She speaks clearly and shows exactly what she is doing each step of the way.  I like how she lets you know if the next section applies to the view you are making or not and it's easy to skip to where you want to go.  Honestly, sometimes if a technique is known to me, I wanted to hurry her up.  I have made blouses and shirts before, but long enough apart that it's always nice to freshen up the 'how-to's.  It is always nice to watch someone else actually doing the step, and see it done smoothly, before you need to do it.  Also, if she struggles a bit (like setting in a perfect sleeve), then I'm reassured my struggles are normal.
I did take the time to watch every step so my blouse took a lot longer than it normally will to make.
Here is the final product:


When I got to the step of the collar, I was so pleased with how easy it was and how nicely it lay:


For the buttonholes, I went to the blogpost by "Dog Named Banjo".  This tutorial really helped me to go step by step with my Bernina 440 buttonholer.  I tried to wing it, but ended up going back and reading the steps again.  She has it laid out very nice.  I did discover the auto feature isn't working on my buttonholer.  It will do one at a time beautifully, so I just did that.   I'll have to go and have my foot recalibrated, apparently.
Speaking of going to the shop, when I got my serger out to help finish off the seams on this blouse, the poor thing decided to freeze up.  She apparently didn't like the move from Arizona to Oregon.  It's been 2 weeks at the Bernina dealer so I'm hoping she's home soon (and doesn't cost an arm and a leg).
My next project is to finish up my 'muslin mock up' with sleeves and facings and have a 2nd version.  It fits well and I think I will enjoy that lightweight fabric this summer!  When my Serging Bernie gets back I will zip that on up!


Friday, April 5, 2013

The making of a Sassy Librarian (Blouse that is)

I am having so much fun taking my new Craftsy class.  It's called 'The Sassy Librarian Blouse' and was a gift from my DDIL.  At first I felt intimidated by printing and taping and cutting out the pattern, but it wasn't actually as bad as I had built up in my mind.

After staring for a day at the stack of printed pages, I jumped in!  It took a while, but I started by laying out the first four pages in a row, lining up the numbers and arrows.


Then acting on the advice of the instructor, I trimmed the border of one side to make it easier to accurately match the arrows and lines.


Sometimes 2 sides had to be trimmed to match up more easily.

This process took me all of one afternoon, and monopolized our large dining room table.  But in the end I had a paper pattern all trimmed out in the size I need for my blouse.
Then came the adventure of making a muslin mock up to make sure it would fit before I actually cut into the 'real' fabric.  I only needed to cut out the front and back to see if the fit was right for me.  I put in the darts and sewed the side seams together.


It seems to fit perfectly with one minor adjustment. I had to let the side seem out at the bottom about 3/4 of an inch.  I unpicked about 4 inches and think I will add paper to the pattern angling down from the 4" mark adding 3/4" to the bottom on each side.  Keeping the 5/8" seam allowance, that should be just right!


So now I'm ready to add to the paper pattern and cut out the real blouse fabric!

Are you taking this class?  Please share your challenges and solutions with me in the comments.

Tuesday, November 27, 2012

Getting the quilt ready for the quilter!

C & S's Irish chain quilt top is now ready for the quilter.  Sometime back I took a class at our LQS "Material Obsession" about getting your finished quilt ready for the quilter.  So here's what I did:

1.  Square up the quilt.  It's hard to put a wonky quilt on a Longarm quilting machine and not have the wonkiness show up.
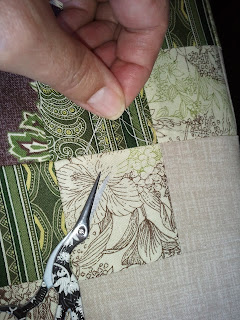
2.  Iron and snip.  Even if you were careful about snipping threads as you made the blocks, there are still thread here and there sewn into the seams. 


 It helps if first you can give the quilt a good shake to lose a batch of the loose threads.  Then Press, snip, press, snip, press, snip.  It helps to have a large ironing surface.   One thing I learned is to keep a trash bin next to you for the threads you are getting rid of.  If they brush on the floor, you will pick them up again on your quilt as you continue with the pressing.


One thing I forgot:  Measure the quilt for the back before you fold it up nice and pressed.  I did have to lay it back out and measure for making my backing.  
I am using one of the leftover plain blocks for my label, so I need to make my backing in strips.  I know the quilting will affect my label, but that's okay.
Here is the beginning of the quilt label:


It's kind of big for a label, but I had the extra block and I wanted to try this old applique pattern I have.  It's from Mckenna Ryan's designs but I can't seem to locate the pattern cover right now, but it is an old one, pre block of the month.

Now onto the back!

On my Knitting needles:

I've been finishing up my Seaweed Vest that I started last year. 


  Since we are planning a move and I started packing up my books, I didn't have the pattern so I could do the finishing on the edges.  I know it was planned to be an I-cord finish, but I chose another I had done in the past instead.  I picked up the stitches around the neck and proceeded as follows:

purl 3 rows, knit 3 rows, purl 3 rows.  Bind off loosely.

Do you like how it finished?

For the armhole I just purled 3 rows, then cast off.  It curls in just right and finishes it off without adding to much width.

I like how it turned out.

It's a bit shorter than I wanted, - and I thought I measured well -
so I might just add the same neckline edging to the bottom and it might add about 2".

Friday, September 28, 2012

The Irish Chain saga

I titled this 'saga' but it's not a sad saga.  This was fun starting while visiting my daughter in Oregon, T.  I had an idea of colors, but with her help and a trip to JoAnn Fabrics we came up with these:
Basic triple chain block - 38 done!

New DIL3, S, said she would like neutrals, but T said green is the new neutral!  (It doesn't hurt that that's her favorite color).  But I think the colors work well together and we forged ahead and made all the triple chain blocks together, all 38 of them!


 Then I came back to Arizona, picking up Mom on the way home.  Mom and I worked on cutting and getting ready to sew the alternate blocks.  We had a nice time chatting and I cut - then I realized I had cut the base color too narrow!  
When we originally bought the beige - a very nice linen looking fabric - I bought 2 yards.  When we left T's in Oregon I started thinking I would need more so in Santa Clarita, CA with DIL2, Tf, I went to JoAnn Fabrics there.  Lo and Behold we found the exact fabric!  I bought another yard, so thought I was good till Mom and I chatted my way into a wrong cut.  I know, I know, "measure twice, cut once".  Any way - when we took Mom home to So. CA, a 5 hour drive, we stopped in Hemet at a JoAnn's but after much searching I couldn't find the exact fabric.
Now, back in Arizona, I decided to drive the hour or so to JoAnn's in Bullhead and my girlfriend found the right stuff nearly as soon as we started looking!  Yay!  So I could continue on.


 Now it's all laid out with 3 seams to go!  Son, C & DIL3, S arrive tomorrow from their home in Ecuador so I'm hoping to have this all together as a taste of what's to come.  
So now I have a question for you.  I usually buy my fabrics for quilts in a quilt shop.  This time we did what was easy and didn't search for one in Oregon, but went right to JoAnn's.  I found that a couple of the fabrics frayed.  One is actually fraying A LOT!  Do you find that?  Also, this was the first time I didn't prewash - we wanted to get right to the stripping and sewing since T had that day off work.  Do you think had I pre washed the fraying would've been less?  Just wondering.  Let me know what you think in the comments.  
Hopefully there will soon be a totally completed quilt to photo shoot for the next blog.